Battery switch on travel trailer function is crucial for managing your RV’s power. Understanding how to use your battery switch – whether it’s a simple 1-2-both-off or a more sophisticated model – is key to preventing dead batteries and electrical problems. This guide breaks down the process, covering everything from connecting to shore power to troubleshooting common issues, helping you keep your travel trailer’s electrical system running smoothly.
We’ll explore different battery switch types, their advantages and disadvantages, and provide step-by-step instructions for safe operation. Learn how to properly connect and disconnect your batteries, maintain your system to prevent corrosion, and troubleshoot problems when things go wrong. We’ll also show you how the battery switch interacts with other essential components like your converter, inverter, and solar panels.
Get ready to become a travel trailer electrical expert!
Understanding Battery Switch Functionality in Travel Trailers
A battery switch is a crucial component in a travel trailer’s electrical system, allowing you to control the flow of power from your trailer batteries. This control is essential for managing battery power, preventing accidental drain, and extending battery life. Understanding how your battery switch works is key to avoiding frustrating situations like dead batteries and malfunctioning appliances.
Battery Switch Purposes, Battery switch on travel trailer function
The primary purpose of a battery switch is to isolate or connect your trailer’s house batteries (used for interior lights, appliances, etc.) from the tow vehicle’s charging system and/or shore power. This prevents unwanted battery drain when the trailer isn’t connected to a power source, and protects your vehicle’s battery from being drained by the trailer’s systems. It also allows you to select which battery bank (if you have two) to use, or to completely disconnect both from the trailer’s electrical system.
Types of Battery Switches
Several types of battery switches are commonly used in travel trailers. The most common are the 1-2-Both-Off and the 1-2-Both switches.
- 1-2-Both-Off: This type allows you to select either battery 1, battery 2, both batteries, or to completely disconnect both from the trailer’s electrical system. This offers the greatest control over your battery power.
- 1-2-Both: This switch is similar but lacks the “Off” position. This means both batteries are always connected to the trailer’s system unless you manually disconnect them at the battery terminals.
Other less common types may exist, offering features like additional safety mechanisms or remote control capabilities.
Operating a Typical Battery Switch
Proper operation is straightforward. Most switches use a rotary dial or lever.
So, you’re an audiophile who loves to travel? Awesome! Check out this guide on creating the perfect audiophile travel setup to ensure your tunes sound amazing on the go. And don’t forget to sort out your travel insurance before you jet off; getting Aon travel insurance is a smart move for peace of mind, protecting your precious gear and yourself during your adventures.
- Identify your switch: Locate the battery switch, usually near the batteries themselves or in a readily accessible area inside the trailer.
- Understand the positions: Familiarize yourself with the switch’s positions (1, 2, Both, Off). The markings should be clearly visible.
- Select the desired position: Carefully rotate the dial or move the lever to the position you need. For example, if you’re connected to shore power and want to charge both batteries, select “Both”. If you’re disconnected and want to avoid draining the batteries, select “Off”.
Always refer to your trailer’s owner’s manual for specific instructions on operating your particular battery switch.
Advantages and Disadvantages of Battery Switch Types
| Feature | 1-2-Both-Off | 1-2-Both |
|---|---|---|
| Battery Drain Prevention | Excellent – complete isolation possible | Fair – requires manual disconnection at the batteries |
| Flexibility | Excellent – allows independent or combined use of batteries | Good – allows use of individual or both batteries |
| Complexity | Slightly higher – more positions to understand | Simpler – fewer positions |
| Safety | Higher – complete isolation reduces risk of accidental drain | Lower – requires vigilance to prevent unwanted drain |
Connecting and Disconnecting Batteries: Battery Switch On Travel Trailer Function

Properly connecting and disconnecting your travel trailer’s batteries is crucial for safe and efficient operation. Understanding how shore power interacts with your battery system is key to preventing damage and maximizing battery life. This section will guide you through the process, offering best practices for maintenance and safety.Connecting your travel trailer to shore power essentially provides an external power source.
This means your appliances will primarily run off the shore power, reducing the drain on your batteries. However, some systems may still draw power from the batteries even when connected to shore power, depending on your trailer’s setup and how you have your battery switch configured. It’s important to check your specific trailer’s manual for detailed information.
Connecting to Shore Power
When connecting to shore power, first ensure your power cord is securely plugged into both the trailer and the power source. Then, turn on the power at the power source. The lights and appliances should come on, indicating the shore power is supplying electricity. Your battery switch position will determine whether the batteries are also contributing power. If you want to charge your batteries from shore power, ensure the switch is in the appropriate position (consult your owner’s manual).
Disconnecting Batteries
Safely disconnecting your batteries involves a few simple steps but requires attention to detail. Always begin by turning off all appliances and systems within the trailer. Next, locate your battery disconnect switch. This is usually a large switch near the batteries themselves, sometimes inside a compartment. Turn the switch to the “off” position.
This will completely isolate the batteries from the trailer’s electrical system. Remember to consult your owner’s manual for the exact location and operation of your disconnect switch.
Maintaining Battery Connections
Proper maintenance of battery connections is vital to prevent corrosion and ensure reliable power. Regularly inspect the battery terminals for corrosion. Corrosion can manifest as a white, powdery substance or a green, crusty buildup. To clean the terminals, use a wire brush or terminal cleaner to remove any corrosion. After cleaning, apply a corrosion inhibitor or dielectric grease to the terminals to prevent future corrosion.
This will ensure a clean, reliable connection and extend the life of your batteries. It’s recommended to perform this check at least once every three months, or more frequently in harsh climates.
Switching Between Battery Power and Shore Power
The following flowchart illustrates the process of switching between battery power and shore power:[Diagram description: A flowchart with three main sections. The first section shows the trailer unconnected to shore power, with the battery switch in the “battery” position. Arrows indicate the flow. The second section shows the trailer connected to shore power, with the battery switch in the “off” position.
The third section shows the trailer connected to shore power, with the battery switch in the “both” or “combined” position (charging batteries). Each section clearly labels the power source being used (batteries only, shore power only, or both). Clear labels indicate the status of the battery switch.]
Troubleshooting Common Battery Switch Issues
Dealing with a malfunctioning battery switch in your travel trailer can be frustrating, but with a systematic approach, you can often pinpoint and resolve the problem. Understanding the common issues and their symptoms will help you diagnose and fix the problem quickly and safely. This section will guide you through the troubleshooting process.
Battery switch problems usually manifest as a lack of power to certain systems in your RV. This could mean your lights don’t work, the refrigerator doesn’t run, or your water pump refuses to function. Sometimes, the problem isn’t a complete lack of power, but rather intermittent power or low voltage. Understanding the symptoms can help you narrow down the potential causes.
Identifying Common Battery Switch Problems and Their Symptoms
Common problems include a switch that won’t turn, a switch that doesn’t isolate batteries correctly, corroded terminals, and loose wiring connections. Symptoms can range from a complete absence of power to flickering lights or appliances that run intermittently. A thorough inspection is often the first step in diagnosing the issue.
Troubleshooting Steps for a Non-Functional Battery Switch
Before starting any troubleshooting, always disconnect the negative terminal from your batteries to prevent accidental shocks. Then, visually inspect the switch itself for any obvious signs of damage, such as cracks or burns. Check all wiring connections for looseness or corrosion. Clean any corroded terminals with a wire brush and baking soda solution. If the switch still doesn’t work, test the continuity of the switch using a multimeter to verify if the switch is properly making and breaking the circuit.
If the switch itself is faulty, replacement is usually the solution. Remember to always refer to your travel trailer’s wiring diagram.
Troubleshooting Table: Common Battery Switch Problems
| Problem | Possible Cause | Solution | Notes |
|---|---|---|---|
| No power to any system | Faulty switch | Replace the switch | Verify power at the battery and fuse box first. |
| Intermittent power | Loose wiring connections | Tighten or replace loose connections | Check all connections, including those at the battery and switch. |
| Power only to some systems | Incorrect switch position | Check and adjust the switch position | Ensure the switch is set to the correct position for the desired power source. |
| Low voltage | Corroded battery terminals | Clean terminals with a wire brush and baking soda solution | Ensure a good connection between the battery and the switch. |
| Switch won’t turn | Mechanical failure of the switch | Replace the switch | Check for any obstructions preventing the switch from turning. |
Safety Precautions When Troubleshooting Electrical Components
Always disconnect the negative battery terminal before working on any electrical components. This is crucial to prevent accidental shocks and short circuits. Wear appropriate safety glasses to protect your eyes from sparks or flying debris. Use insulated tools to avoid accidental contact with live wires. If you’re unsure about any step, consult a qualified RV technician.
So, you’re an audiophile who travels? Awesome! Make sure you check out this guide on audiophile travel setup to keep your tunes sounding amazing on the go. It’s crucial to protect your gear, and that means having solid travel insurance. Consider looking into Aon travel insurance for peace of mind; you’ll want to be covered if anything happens to your precious equipment.
Planning ahead ensures your adventures are filled with great music and worry-free travel!
Never work on electrical components in wet or damp conditions.
Battery Switch and Related Electrical Components
Your travel trailer’s battery switch is the central control point for your 12-volt DC system, but it doesn’t operate in isolation. Understanding its relationship with other electrical components is key to maintaining a reliable power supply. This section will explore how the battery switch interacts with your converter, inverter, and solar panel, and how different wiring configurations affect its function.The battery switch acts as a master on/off switch, controlling the flow of power from your batteries to the rest of your trailer’s 12V system.
This system includes components like lights, water pump, and refrigerator (if 12V). Other components, such as the converter (which changes 120V AC to 12V DC), inverter (which changes 12V DC to 120V AC), and solar panel (which generates 12V DC power) all interact with the battery switch either directly or indirectly.
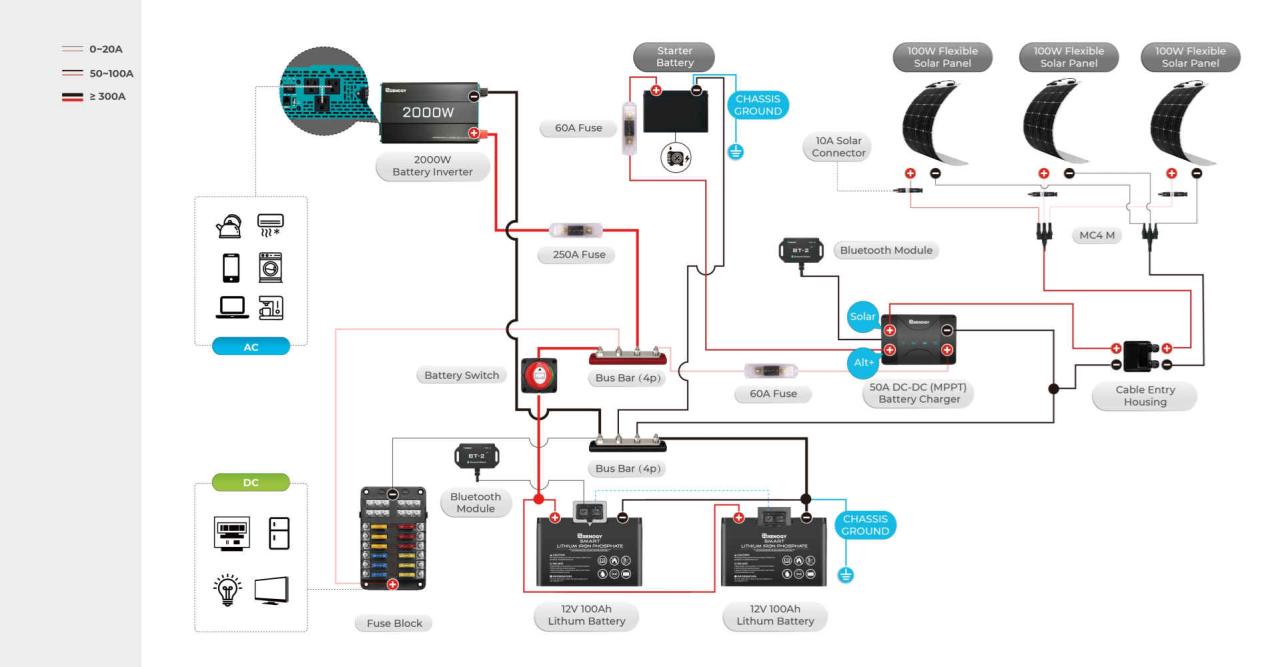
Wiring Diagram of a Typical Travel Trailer Electrical System
Imagine a simple diagram. At the heart is your battery switch, depicted as a simple switch symbol. From this switch, multiple wires lead to different parts of the trailer. One wire goes to your trailer’s house batteries (typically two 12V deep-cycle batteries connected in parallel). Another wire connects to the input of your converter.
The converter then outputs 12V DC power to various components in the trailer. A separate wire runs from the battery switch to the input of your inverter. Finally, another set of wires connects to your solar charge controller, which then connects to your solar panels. If you have a separate battery charger that is not integrated into your converter, it will also connect to your battery bank through the battery switch.
This illustration shows a simplified system; more complex setups may exist depending on the trailer’s features and equipment. The key is that the battery switch controls the primary power source for most 12V DC components in the trailer.
Impact of Different Wiring Configurations on Battery Switch Functionality
Different wiring configurations can significantly affect how your battery switch functions. For instance, if the solar charge controller is wired directly to the batteries, bypassing the battery switch, your solar panels will continue to charge the batteries even when the battery switch is off. This might be desirable in some cases (to keep batteries topped off during storage), but it also means your batteries won’t be fully isolated.
Conversely, if the converter is wired to always receive power, regardless of the battery switch position, you’ll still have 12V power to some components even when the battery switch is off. This is usually the case as the converter receives AC power directly from the shore power. The best setup would depend on your specific needs and preferences, but a well-planned system will offer flexibility and control.
Determining the Correct Amperage for Fuses and Breakers
Fuses and circuit breakers protect your wiring and components from overcurrent situations. The amperage rating of these safety devices should always match or exceed the maximum current draw of the circuit they protect. For example, if the total current draw of all the components connected to a particular circuit branch from the battery switch is 30 amps, you should use a 30-amp fuse or breaker or higher.
Never use a lower amperage rating, as this could lead to overheating and potential fire hazards. Always check the amperage ratings of your components (printed on the device) and calculate the total amperage of the entire circuit before choosing fuses and circuit breakers. Using appropriately rated fuses and breakers is crucial for preventing electrical fires and maintaining a safe and reliable system.
Remember to consult your owner’s manual for your specific trailer model to verify the recommended fuse and breaker sizes.
Maintaining the Battery Switch and Batteries
Keeping your travel trailer’s battery system in top shape is crucial for reliable power on the road. Regular maintenance of both the battery switch and the batteries themselves will significantly extend their lifespan and prevent frustrating breakdowns. Neglecting this maintenance can lead to premature failure, costly replacements, and inconvenient power outages during your adventures.Proper maintenance involves both preventative measures and routine checks.
By following a simple schedule, you can ensure your battery system remains dependable and provides years of trouble-free service. This translates to more time enjoying your travels and less time dealing with electrical issues.
Preventative Maintenance for the Battery Switch
Regular cleaning is key to preventing corrosion and ensuring reliable contact. A build-up of dirt, dust, and grime on the switch’s terminals can impede the flow of electricity, leading to poor performance or complete failure. Use a wire brush or a dedicated battery terminal cleaner to remove any corrosion. Apply a thin layer of dielectric grease to the terminals after cleaning to prevent future corrosion and ensure a clean, reliable connection.
This simple step can significantly extend the life of your battery switch. Additionally, visually inspect the switch regularly for any signs of damage, loose connections, or overheating. If you notice any issues, address them promptly.
Regular Battery Maintenance
Maintaining your batteries is just as important as maintaining the switch. Regular inspection and cleaning are essential for optimal performance and longevity. For flooded lead-acid batteries, check the water levels regularly and add distilled water as needed to keep the cells properly filled. Never use tap water, as the impurities can damage the batteries. Clean the battery terminals with a wire brush and baking soda paste to remove any corrosion.
Apply a thin layer of dielectric grease to the terminals after cleaning to prevent future corrosion. For AGM or gel cell batteries, the maintenance is less frequent; however, regular visual inspections for cracks or damage are still recommended. Keep the battery case clean and dry to prevent corrosion.
Routine Inspection and Maintenance Checklist
Regular checks will help you catch potential problems before they become major issues. This checklist Artikels the essential steps to follow for a thorough inspection.
- Visually inspect the battery switch for any signs of damage, corrosion, or loose connections.
- Clean the battery switch terminals with a wire brush and apply dielectric grease.
- Check the battery cables for any signs of damage, fraying, or corrosion.
- Inspect the batteries for any signs of damage, leakage, or corrosion.
- For flooded lead-acid batteries, check the water levels and add distilled water if necessary.
- Clean the battery terminals with a wire brush and baking soda paste and apply dielectric grease.
- Test the battery voltage with a multimeter to ensure they are properly charged.
- Test the battery switch functionality by switching between battery banks and observing the voltage readings.
Replacing a Faulty Battery Switch
If your battery switch fails, replacing it is often a straightforward process. Before starting, disconnect the negative battery cable from both batteries to prevent accidental shorts. Then, carefully remove the switch from its mounting location. Note the wiring configuration before disconnecting the wires from the switch. Install the new switch, ensuring the wiring is correctly connected according to the original configuration.
Reconnect the negative battery cable to both batteries, and test the functionality of the new switch. Always refer to your specific battery switch and trailer’s wiring diagram for detailed instructions. Remember, if you are uncomfortable working with electrical systems, it’s best to consult a qualified technician.
Mastering your travel trailer’s battery switch is about more than just turning power on and off; it’s about understanding your RV’s electrical system and ensuring safe and reliable operation. By following the tips and troubleshooting advice provided, you can extend the life of your batteries and your battery switch, preventing costly repairs and ensuring worry-free adventures. So, familiarize yourself with your specific setup, perform regular maintenance, and hit the road with confidence!
Popular Questions
What happens if I leave my battery switch in the “off” position for a long time?
Leaving your switch off for extended periods is generally fine, but it prevents charging from shore power. Make sure your batteries are charged before prolonged storage.
Can I use a different type of battery switch than what came with my trailer?
You might be able to, but it’s best to consult an RV electrician to ensure compatibility and safety. Incorrect amperage could damage your system.
How often should I check my battery terminals for corrosion?
Ideally, check them every few months, or more often if you notice any signs of corrosion (white powder or green buildup).
My battery switch is making a clicking noise. What’s wrong?
This often indicates a problem with the switch itself or a loose connection. Check all connections and fuses before replacing the switch.
